
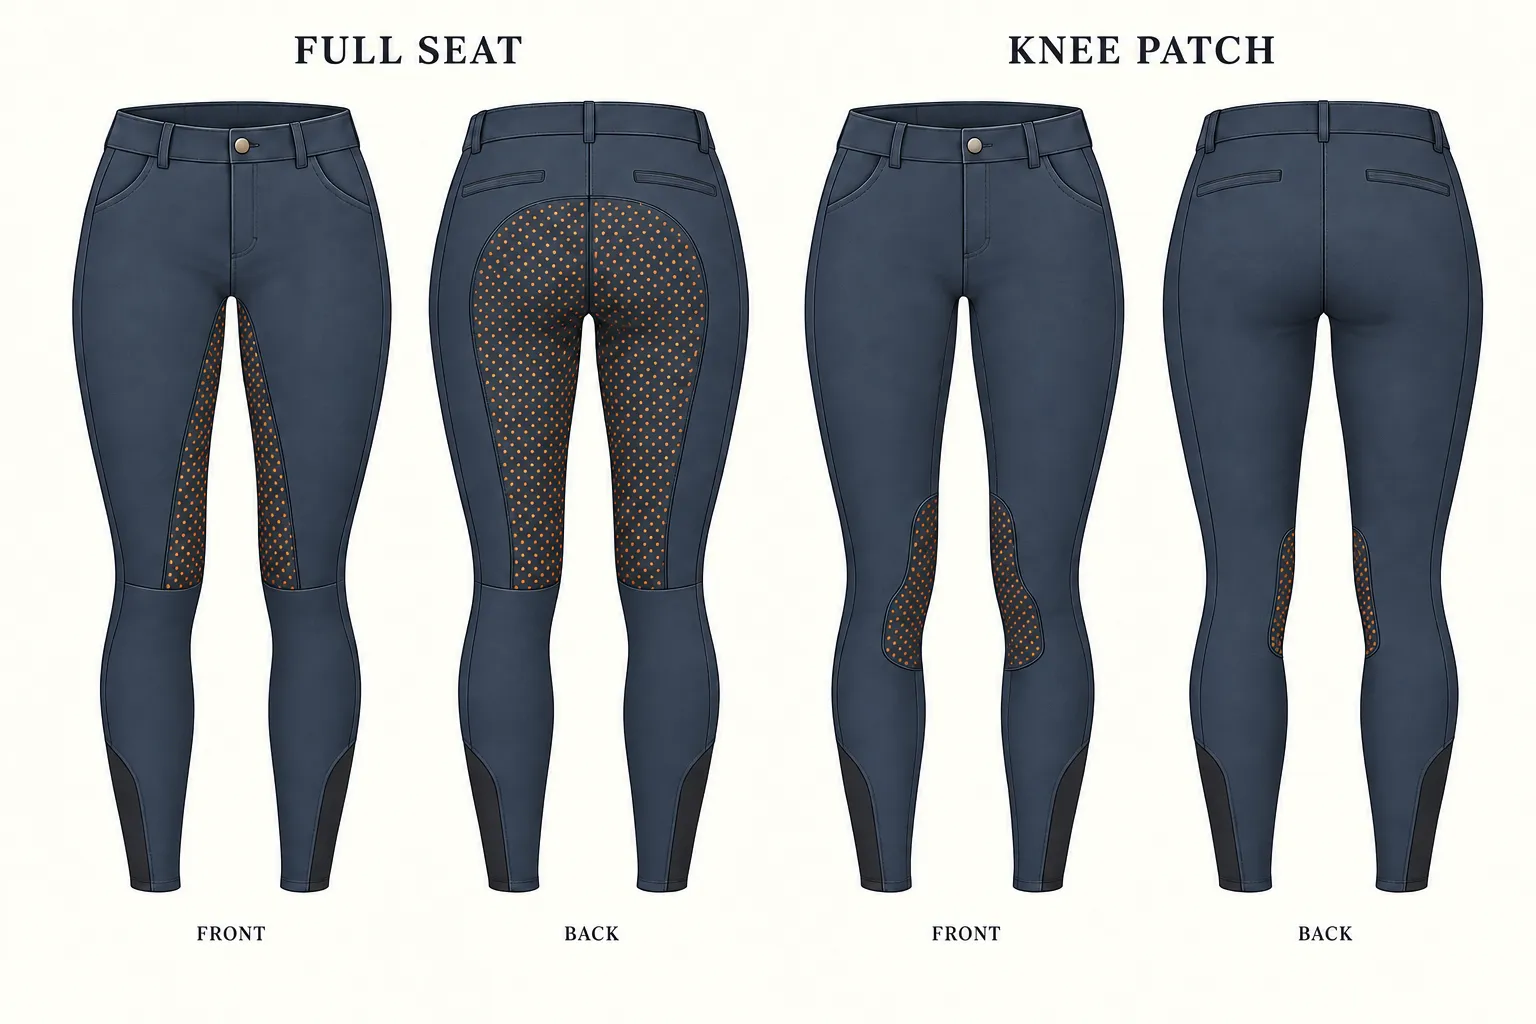
Full-seat breeches place grip across the seat and along the inner legs; knee-patch breeches concentrate it around the inner knees. For a brand developing a collection, that is the starting distinction. Choose the coverage for your target rider, then specify the fabric, grip treatment, fit and sample checks that will determine how the finished garment feels.
In this guide
What is the difference between full-seat and knee-patch breeches?
The distinction is grip placement. Ariat describes a full-seat layout extending from the knee through the inner thigh to the seat, while its knee-patch layout focuses on the knee. Kerrits also describes the difference by placement and coverage, with some full-seat designs extending farther down the inner leg. The exact boundary therefore belongs in your drawing, not just in the product name.
| Design point | Full seat | Knee patch |
|---|---|---|
| Main grip area | Seat and inner legs; boundary varies | Inner knee area; patch shape varies |
| Seat treatment | Includes grip across the seat | Seat usually has no grip treatment |
| Drawing priority | Seat coverage and continuity into the inner legs | Knee position, dimensions and left/right alignment |
| Sample priority | Seat comfort, coverage and freedom to reposition | Patch location when the knee bends and the leg moves |
| What the name does not establish | Grip strength, durability or a suitable fit | Grip strength, durability or a suitable fit |
Match the option to your rider, rather than a fixed rule
Kerrits associates knee-patch designs with hunters, jumpers and eventing, and full-seat designs with dressage, while also noting rider preference. Treat those associations as market context. They do not establish that every rider in a discipline needs the same construction. Ask the intended customers about the contact and freedom of movement they prefer.
For collection planning, define a specific wearer and occasion: daily lessons, a tailored competition range or a training garment for an established customer group. Ask existing customers which grip layouts they use, what they like about them and what they would change. If the product is intended for competition, confirm the relevant current dress requirements independently before finalizing colors and details.
A useful brief might say: “Develop a structured riding breech for customers who prefer targeted knee grip, with a defined waistband and a phone pocket.” That is more actionable than asking for the “best breeches.” It gives the pattern maker and sample reviewer a shared purpose without pretending that one grip layout suits everyone.
Separate grip coverage from grip material and pattern
Coverage tells you where the grip sits. It does not specify the treatment. State the intended material, application and visual pattern separately. If silicone is proposed, agree the artwork dimensions, placement and appearance on the chosen fabric. If a patch material is proposed, review its edge construction, stretch compatibility and interaction with surrounding seams.
Do not compare two samples as if coverage were the only variable when their fabric, grip treatment and fit also differ. For a useful development comparison, keep the base specification consistent where practical and record each change. Describe the result in terms the reviewer can observe: freedom to reposition, pressure at a seam, appearance when stretched or changes after care.
Avoid turning an illustration into a product promise. The dot pattern in our diagram identifies a design direction; it does not prove a particular friction value, saddle compatibility or wash life. Those expectations need an agreed specification and suitable evaluation for the material and finished garment.
Write a grip specification the supplier can reproduce
Mark grip areas on both front and back drawings. A back view alone may not communicate how the treatment wraps around the inner leg. Reference fixed garment landmarks, such as a seam or measurement point, so the supplier can position the artwork consistently. Agree how that placement changes across sizes instead of assuming the same artwork can simply be used everywhere.
| Specify | What to record |
|---|---|
| Coverage boundary | Seat and inner-leg areas, or knee-patch outline, on front/back views |
| Artwork | File version, repeat pattern, dimensions and orientation |
| Position | Distance from agreed garment landmarks in the sample size |
| Color and appearance | Reference for color, finish and visibility on the selected fabric |
| Size variation | How artwork size and position are checked across the range |
| Approval evidence | Annotated photographs and the agreed physical sample |
Discuss the manufacturability of the proposed treatment before treating it as an available option. The supplier must confirm the actual material and application for your brief.
Develop fabric, waistband and leg fit together
Grip is one part of a riding breech. Define the fabric composition and weight, and ask how stretch and recovery will be evaluated for your intended fit. A fabric that stretches easily may still feel different once a grip treatment, seam or pocket is added. Review the finished sample rather than making the decision from an undecorated swatch alone.
Specify rise, waistband shape, inseam and the intended wearing position. Check how the waist behaves when the rider sits and reaches forward. Review pocket openings, seams around the seat and crotch, and whether the lower leg sits smoothly with the intended boots. Record observations against measurements and construction details so feedback can be translated into a pattern change.
Set out the size range and grading approach. A knee patch that sits correctly in one sample size can shift relative to another wearer’s knee. Review the sizes needed for your development plan and identify how patch placement will be checked. The same principle applies to full-seat coverage: scale and position should support the intended fit rather than follow a decorative layout alone.
Use a practical sample review sequence
Review the sample in a repeatable order and keep a written record. Use the same specification and evaluation criteria when comparing revisions. Rider feedback is valuable, but record who evaluated which size and under what conditions so the result is not treated as a universal conclusion.
1. Check the garment laid flat
Compare measurements with the agreed chart and tolerances. Inspect left/right symmetry, grip boundaries, artwork orientation and seam appearance. Check waistband closure, pockets and lower-leg finishing. Photograph any difference with a visible measurement reference.
2. Review fit in relevant positions
Check standing, seated and forward-reaching positions with the intended clothing and boots. Record pulling, pressure or restriction around the waist, crotch and knee. Check whether the grip is positioned as intended when the leg bends, rather than only when the garment lies flat.
3. Evaluate movement and contact
Have suitable riders assess comfort and freedom to reposition in the intended use. Record the conditions and individual preferences. Treat feedback as product-development evidence for that sample; do not describe one trial as proof that a construction is safer or better for all riders.
4. Review after the proposed care process
Agree the care instructions and evaluation conditions before testing. Recheck measurements, appearance, seams and grip condition afterward. Look for changes such as lifting, cracking or distortion and record results. Any specific durability claim needs evidence under defined conditions.
Choose a first-order brief you can evaluate
If you are deciding between two grip layouts, start by defining the wearer and the feedback needed to choose. Ask the manufacturer how the variants are classified and quoted. Do not assume that different grip treatments can be combined under one style’s minimum, or that an unchanged silhouette means an unchanged production setup.
EZ Equestrian’s confirmed minimum is 100 pieces per style per color. Send your drawings, proposed colors, quantities and target measurements, together with the grip details you want to explore. We can discuss the development requirements for your brief. Available materials, treatment options, size mixing and order classification need confirmation before production.
A clear enquiry asks for a defined garment and identifies the decisions still open. It gives the supplier a better starting point than an unsupported request for “maximum grip,” and gives your team a concrete sample to assess.
Frequently asked breeches development questions
Should I choose full-seat, knee-patch or no silicone grip?
Full-seat silicone covers the seat and inner leg; knee-patch silicone focuses on the inner knee; a no-silicone style keeps those areas as plain fabric. Choose around your target rider’s preference, discipline and garment feel. Coverage alone is not a measured grip rating, so compare the actual samples.
Can the silicone grip use our own pattern or logo?
Yes, we can review your artwork for a custom grip layout. Specify full-seat or knee placement, motif size, spacing and preferred color. We check the layout against the cut panels and size range, then review definition, alignment and the finish on the selected fabric sample.
TAKE THE NEXT STEP
Explore custom riding breeches